Hello,
I have the pleasure to announce that after a long break i've started a new blog on www.mihaisworkshop.com and my goal is to have at least one video and article published per week.
I've just started this blog so in time it will have all sorts of videos / articles on it
If you enjoyed something on this blog and you would like more informations / dimensions/ or just a video from a project from here let me know and i'll take in consideration your thoughts / opinions.
Thanks for your attention :)
Monday, February 6, 2017

Thursday, July 24, 2014
Homemade Chicken Incubator V2 - SketchUp drawings
This year i've made another incubator and i've made some changes from my first build. It has the same elements like: light bulb, computer fans, light dimmer, etc. but i've change the placement of them.
So... my first incubator had the water tray on the left side of the box in this build the water trays are placed on the bottom and i have moved the eggs upper.
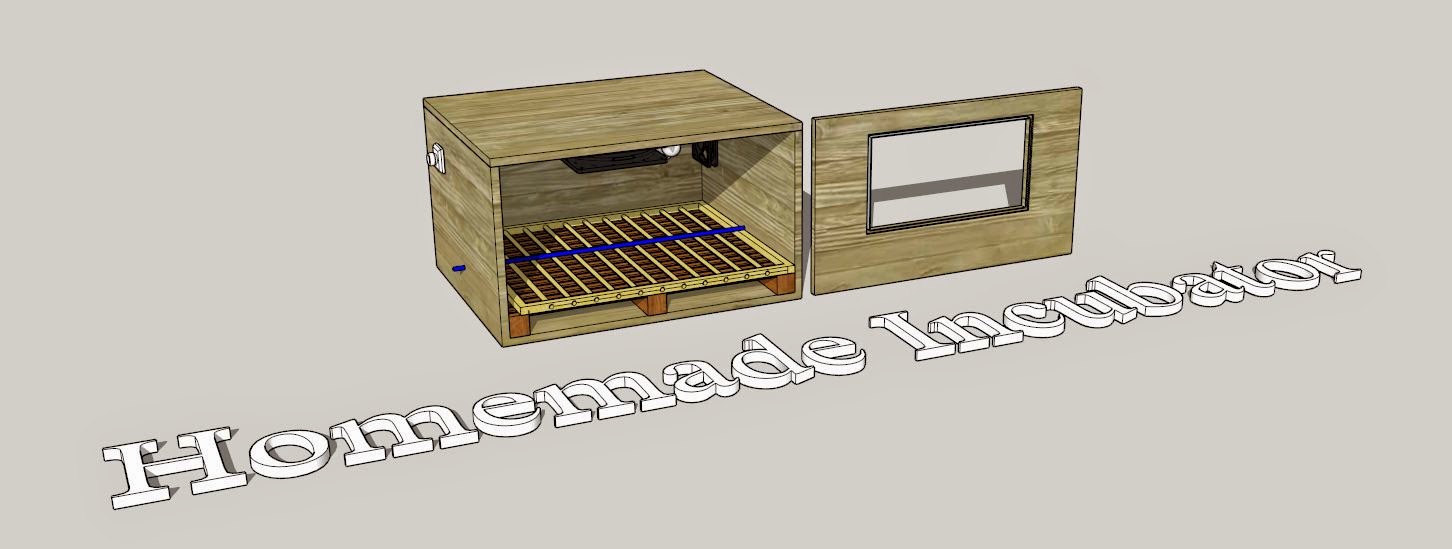
So... my first incubator had the water tray on the left side of the box in this build the water trays are placed on the bottom and i have moved the eggs upper.
Saturday, July 19, 2014
Greenhouse update
This year i've made some changes to my greenhouse: the first change was to replace the plastic foil from the roof with a new one. While the plastic foil was off from the roof i've made some changes to the wooden frame of the greenhouse last year the sides could be raised and lowered with a long board that held the plastic foil for the sides but this year i've made some panels (windows) that can be lowered or raised as needed.

Metal work to do woodworking
My latest project was a table for my grandma and for this project i had used most of my power tools. The project began with purchasing the wood and here is not easy or cheap to buy planed wood boards so i bought rough lumber for this project.
First step was to put a straight edge on the boards for the table top and for this i used my small power planer after this i ripped the boards on my table saw to the maximum width that i could get from them.

First step was to put a straight edge on the boards for the table top and for this i used my small power planer after this i ripped the boards on my table saw to the maximum width that i could get from them.
Thursday, July 17, 2014
Grow chickens - food and medicine
We have a step-by-step program with our chickens from the moment they hatch until we put them with the rest of the chickens that we have.
First step is to select the eggs for incubating process and for this step we are using a led flashlight to be able to see inside the eggs.
At the end of the incubating period the chickens are placed in a cardboard box with one light bulb over them to keep them warm. In the water we are putting vitamin: A, D3, E for 3-5 days. For the first 7 days we are feeding them corn flour mixed with boiled egg yolk.

First step is to select the eggs for incubating process and for this step we are using a led flashlight to be able to see inside the eggs.
At the end of the incubating period the chickens are placed in a cardboard box with one light bulb over them to keep them warm. In the water we are putting vitamin: A, D3, E for 3-5 days. For the first 7 days we are feeding them corn flour mixed with boiled egg yolk.
Saturday, July 12, 2014
New table saw - new project: table saw stand
When i've built my first greenhouse i bought a table saw but it had a lot of problems and some of them i had tried to fix them but i've started to work more and more with wood and i said that is time to get a better table saw.
My new table saw is Makita MLT100 and i'm very delighted about this saw and how it works, how accurate it is (i had to tweak it a little bit to get it to this stage).

My new table saw is Makita MLT100 and i'm very delighted about this saw and how it works, how accurate it is (i had to tweak it a little bit to get it to this stage).
Friday, July 11, 2014
Chickens this year
One of my best blog post was the homemade incubator because of this i'll prepare an other post about my homemade incubator ver. 2.
But now i would like to present to you, my reader, what i've made this year with my incubator:
 The red one that is looking at my finger is my favorite one ;)) last year i had 2 favorite chickens (one rooster and one chick - i'll put a photo later on with my rooster).
But now i would like to present to you, my reader, what i've made this year with my incubator:
Wednesday, July 2, 2014
Woodworking project - table for my grandma
Lately i've started to gather woodworking tools and do small projects with wood.
Not so long ago i've overheard my grandma that she wants to buy a new table so i've said that this is a good opportunity to practice what i've seen on youtube and other blogs.

And this is what i have done :)
Tuesday, July 1, 2014
Strawberries in aquaponic system
I did try to learn how to grow into an aquaponic setup and overall was a success but i had more that an few problems:
1. First problem that i ran into was the water level from the grow pvc pipe
cause:
i have made a big hole at one end that i used for drainage purpose.
solution:
cover the hole and control the water level inside the pvc pipe.

Monday, April 28, 2014
I'm back - small aquaponic system
I know it has been a long time since i've put something up but this doesn't mean that i haven't done anything in this time. I had a lot of projects, with some of them i had good luck with others not so much....
Lately i have been working at this:

Sunday, June 16, 2013
Garden update


I want to show you a small update from my garden.
Yesterday, 16.06.2013, i've spent some time in my garden and i manage to do some photos and a video tour of my garden. The video will be available latter on this day (i think after 6 pm local time).
Yesterday, 16.06.2013, i've spent some time in my garden and i manage to do some photos and a video tour of my garden. The video will be available latter on this day (i think after 6 pm local time).

When i was shooting photos with some of my cucumbers i manage to catch a bee inside the cucumber flower :). This is the first place were i have cucumber planted and the plants are bigger than the rest of my cucumbers. I also have cucumber inisde the big green house and in the back of my yard.
Sunday, June 9, 2013
Chicken incubator - update
This morning i have been waked by a noise from the incubator....
after wrestling for 30-40 minutes trying to fall asleep again i went to the incubator and this guy wake me up:

Friday, June 7, 2013
Garden update
I know that i haven't posted anything on my blog for some time but i have been very busy with work (at work and at home) and now i want to show you how my garden looks like and a small update with what i have done lately.

Tuesday, May 21, 2013
Chicken incubator - homemade
The story began last year when by mistake i saw one video on youtube with one homemade incubator and it was interesting and i started to watch more videos regarding this subject.
After a day or two on youtube i began reading about incubators and the conditions needed to incubate eggs. While i was watching those videos i was paying attention to what kind of materials were used and at the design of the incubators.
I realized that i had almost all the parts already at home so... in one day i've started working at my homemade version.

Tuesday, May 14, 2013
Now i have some tomatoes
Tomatoes are planted
After I almost managed to complete construction for the big green house, still must make them the door, I managed to plant tomatoes. In fact I have planted tomatoes two days ago but I was very busy at work and I could not post anything on the blog ....

Sunday, May 12, 2013
All it needs it's a door....
Big green house
My seedlings are getting bigger and i'll have to move them soon so even though yesterday was sunday i've started my day with a big cup of coffee and i was thinking at the big green house watching the frame from my patio.
While i was finishing my coffee ideas came to my mind regarding the last steps of the build. So prepared with some ideas i've prepared the tools that i used to finish the build and start working.

Thursday, May 9, 2013
Almost complete - big green house update
I know that i haven't posted anything on my blog for a while ...but i have been really busy at work and working at my big green house.
Last weekend we had Easter celebration and i haven't did anything ... that was a wierd period for me because usually i do something around the house or in my garden. I'm not used to doing nothing...

Sunday, May 5, 2013
Germination - step by step
I had used the term germination in my previous posts but i did not explain how i did it.
So today i'm making a small tutorial about germination and how you can do it yourself.

- paper towels
- a glass with water
- a ziplock bag
Saturday, May 4, 2013
Big green house update
Big green house update:
Although it was Saturday i did a lot of things including: homemade tool (full article on my blog), I went shopping with my wife and daughter , and I worked at the big green house .....
To begin working on the big green house I had to cut planks from a big piece of wood to achieve this I used the table saw.

First tool
A while back James Neal posted a tool good for gardening and i I thought it was easy to do so this is my approach to make that tool:

Next i've prepare the tools that i'll use to make my own gardening tool:
- angle grinder
- hammers
- welding machine
- different disks for the angle grinder.
- safety glasses.
Subscribe to:
Posts (Atom)